
State transition diagram (TikZ)
TikZ's automata library draws state machines to the standard expected in papers and theses, with proper accepting states and curved transitions.
#What this example shows
The automata library, with initial and accepting states.
Bent edges, so two transitions between the same pair do not overlap.
A self-loop with a positioned label.
#A worked example
Open it, edit it, or copy the source below.
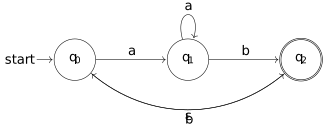
The source, which you can paste into a new diagram and edit:
#Making it your own
bend left and bend right stop parallel transitions overlapping.
node[swap] flips a label to the other side of its edge.
on grid with node distance keeps the spacing even without manual coordinates.
#Related
Exact, or not worth drawing.