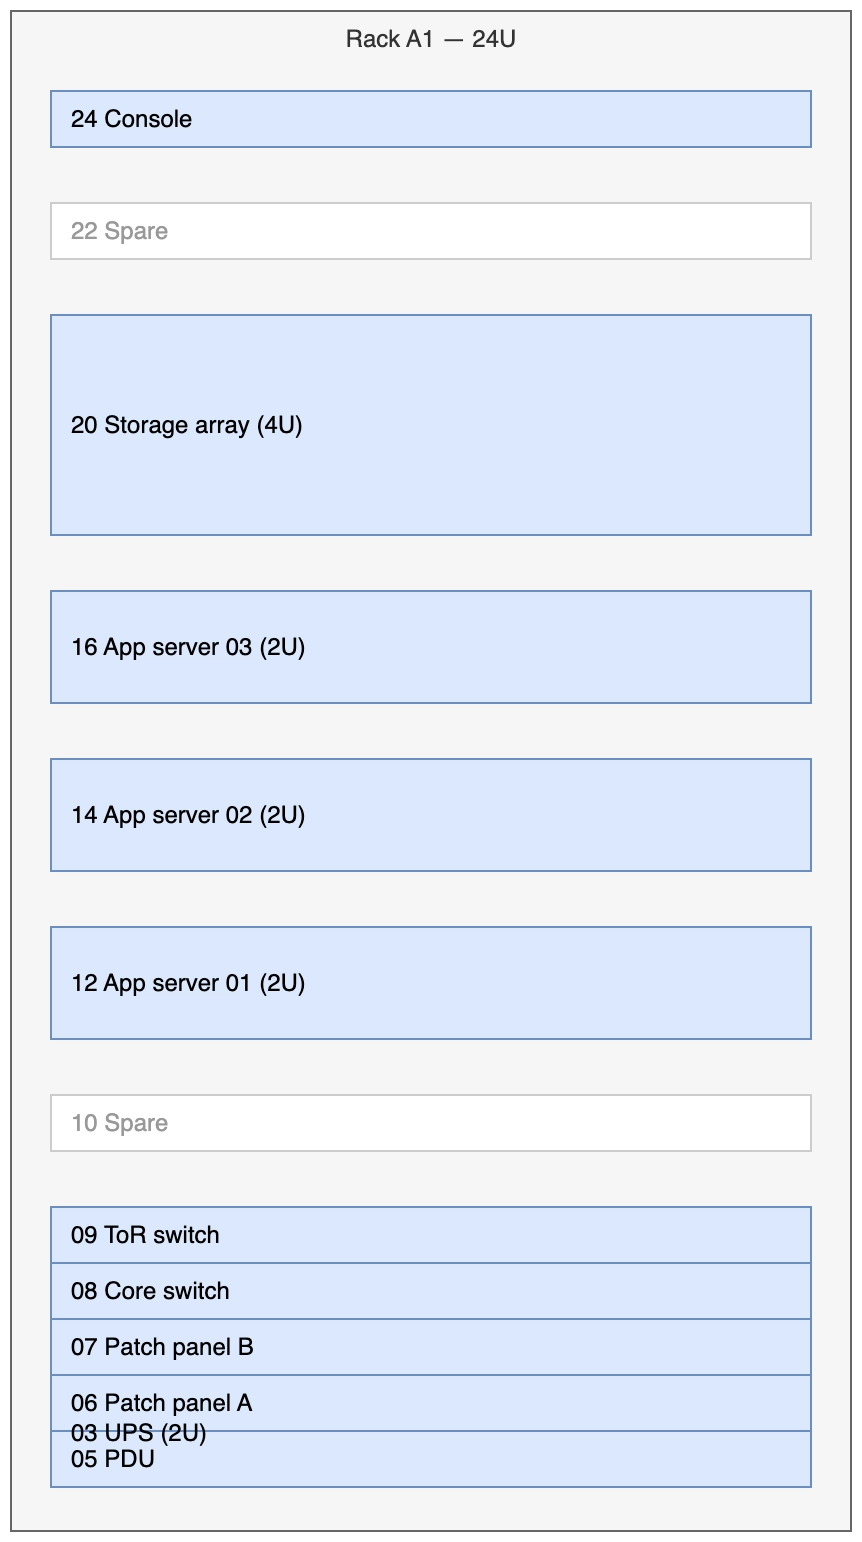
Rack layout (draw.io)
A rack elevation drawn on a canvas. Compare it with the RackDiag example: this one takes longer to build and lets you put anything you like on it.
#What this example shows
Units numbered from the bottom, as they are in the room.
Empty units drawn rather than omitted, because they are capacity.
Equipment spanning several units.
#A worked example
Open it, edit it, or copy the source below.
The source, which you can paste into a new diagram and edit:
<mxfile host="app.diagrams.net" modified="2026-09-02T00:00:00.000Z" agent="Capable" version="24.7.7">
<diagram name="Page-1" id="page-1">
<mxGraphModel dx="1100" dy="760" grid="1" gridSize="10" guides="1" tooltips="1" connect="1" arrows="1" fold="1" page="1" pageScale="1" pageWidth="1100" pageHeight="850" math="0" shadow="0">
<root>
<mxCell id="0" />
<mxCell id="1" parent="0" />
<mxCell id="rack" value="Rack A1 — 24U" style="rounded=0;whiteSpace=wrap;html=1;fillColor=#f5f5f5;strokeColor=#666666;verticalAlign=top;" vertex="1" parent="1">
<mxGeometry x="320" y="40" width="420" height="760" as="geometry" />
</mxCell>
<mxCell id="u24" value="24 Console" style="rounded=0;whiteSpace=wrap;html=1;fillColor=#dae8fc;strokeColor=#6c8ebf;align=left;spacingLeft=8;" vertex="1" parent="rack">
<mxGeometry x="20" y="40" width="380" height="28" as="geometry" />
</mxCell>
<mxCell id="u22" value="22 Spare" style="rounded=0;whiteSpace=wrap;html=1;fillColor=#ffffff;strokeColor=#cccccc;fontColor=#999999;align=left;spacingLeft=8;" vertex="1" parent="rack">
<mxGeometry x="20" y="96" width="380" height="28" as="geometry" />
</mxCell>
<mxCell id="u20" value="20 Storage array (4U)" style="rounded=0;whiteSpace=wrap;html=1;fillColor=#dae8fc;strokeColor=#6c8ebf;align=left;spacingLeft=8;" vertex="1" parent="rack">
<mxGeometry x="20" y="152" width="380" height="110" as="geometry" />
</mxCell>
<mxCell id="u16" value="16 App server 03 (2U)" style="rounded=0;whiteSpace=wrap;html=1;fillColor=#dae8fc;strokeColor=#6c8ebf;align=left;spacingLeft=8;" vertex="1" parent="rack">
<mxGeometry x="20" y="290" width="380" height="56" as="geometry" />
</mxCell>
<mxCell id="u14" value="14 App server 02 (2U)" style="rounded=0;whiteSpace=wrap;html=1;fillColor=#dae8fc;strokeColor=#6c8ebf;align=left;spacingLeft=8;" vertex="1" parent="rack">
<mxGeometry x="20" y="374" width="380" height="56" as="geometry" />
</mxCell>
<mxCell id="u12" value="12 App server 01 (2U)" style="rounded=0;whiteSpace=wrap;html=1;fillColor=#dae8fc;strokeColor=#6c8ebf;align=left;spacingLeft=8;" vertex="1" parent="rack">
<mxGeometry x="20" y="458" width="380" height="56" as="geometry" />
</mxCell>
<mxCell id="u10" value="10 Spare" style="rounded=0;whiteSpace=wrap;html=1;fillColor=#ffffff;strokeColor=#cccccc;fontColor=#999999;align=left;spacingLeft=8;" vertex="1" parent="rack">
<mxGeometry x="20" y="542" width="380" height="28" as="geometry" />
</mxCell>
<mxCell id="u9" value="09 ToR switch" style="rounded=0;whiteSpace=wrap;html=1;fillColor=#dae8fc;strokeColor=#6c8ebf;align=left;spacingLeft=8;" vertex="1" parent="rack">
<mxGeometry x="20" y="598" width="380" height="28" as="geometry" />
</mxCell>
<mxCell id="u8" value="08 Core switch" style="rounded=0;whiteSpace=wrap;html=1;fillColor=#dae8fc;strokeColor=#6c8ebf;align=left;spacingLeft=8;" vertex="1" parent="rack">
<mxGeometry x="20" y="626" width="380" height="28" as="geometry" />
</mxCell>
<mxCell id="u7" value="07 Patch panel B" style="rounded=0;whiteSpace=wrap;html=1;fillColor=#dae8fc;strokeColor=#6c8ebf;align=left;spacingLeft=8;" vertex="1" parent="rack">
<mxGeometry x="20" y="654" width="380" height="28" as="geometry" />
</mxCell>
<mxCell id="u6" value="06 Patch panel A" style="rounded=0;whiteSpace=wrap;html=1;fillColor=#dae8fc;strokeColor=#6c8ebf;align=left;spacingLeft=8;" vertex="1" parent="rack">
<mxGeometry x="20" y="682" width="380" height="28" as="geometry" />
</mxCell>
<mxCell id="u5" value="05 PDU" style="rounded=0;whiteSpace=wrap;html=1;fillColor=#dae8fc;strokeColor=#6c8ebf;align=left;spacingLeft=8;" vertex="1" parent="rack">
<mxGeometry x="20" y="710" width="380" height="28" as="geometry" />
</mxCell>
<mxCell id="u3" value="03 UPS (2U)" style="rounded=0;whiteSpace=wrap;html=1;fillColor=#dae8fc;strokeColor=#6c8ebf;align=left;spacingLeft=8;" vertex="1" parent="rack">
<mxGeometry x="20" y="710" width="380" height="0" as="geometry" />
</mxCell>
</root>
</mxGraphModel>
</diagram>
</mxfile>
#Making it your own
Enable the rack shape library for vendor-specific equipment shapes.
Add a second rack on the same page for the rear view.
Link each unit to the runbook for that machine.
Open it. Drag something. It is a real canvas.